
General
Create a XP bootable cd (using Nero)
Recovery
Starting WINXP install from DOS
Install Win98 after WinXP install tip
Frequent boot sector corrupts?
Recovering NTFS bootsector (from backup copy)
Create XP bootable Cd using Nero
there comes the situation when you got all the files from your windows xp install but need to reboot using the files on a cd to start the install or repair.For install you can use the DOS method but the repair option is not available in this case.
1.open up nero and select new bootcd
2.change source boot image to the --microsoft.img (extract using winrar from downloadable file here.)
3.change emulation to none
4.change number of loaded sectors to 4
5.change volume label to WXPVOL_EN or any suitable
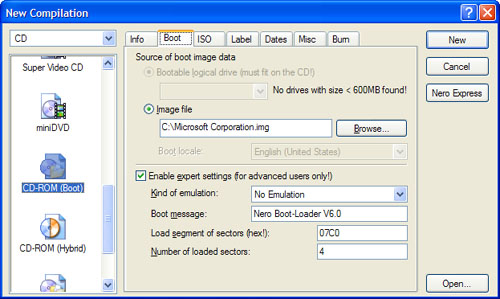
6.burn as image or to cd.
Ever wondered if you can start WINXP install from DOS
These are the steps to do just that:
Boot with a Windows 98 Start Up disk
Insert the Windows 98 CD into the CD drive
Run smartdrv.exe from the Win98 directory on the windows 98 CD (file caching)
Type cd.. to back up to the root directory
Insert Windows XP CD into the CD drive
Copy the i386 folder to C:\
Go into C:\i386 folder on C: and type winnt.exe to launch the setup from the hard drive.
basically any file caching can make this work - smartdrv or pccache
Installing Win98 after a WINXP install
Repairing the Windows XP Boot Loader
Create a Win98 Startup Disk
Create a Notepad file with the following entries, exactly as shown:
L 100 2 0 1
N C:\BOOTSECT.DOS
R BX
0
R CX
200
W
Q
Save the file to the Win98 Startup Disk as READ.SCR
Boot the computer with the Win98 Startup Disk and at the A: prompt type
DEBUG <READ.SCR
Steps 1 - 4 create the BOOTSECT.DOS file needed to boot Win98. You may need to use the ATTRIB C:\BOOTSECT.DOS -S -H -R command if BOOTSECT.DOS already exists and you get an error when trying to recreate it.
Insert your XP CD and boot from it.
Choose Repair.
You'll be asked which XP installation you want to log into. Enter 1. There is usually only one installation.
At the C:\Windows prompt, type FIXBOOT. You'll be prompted to confirm. Do so.
When FIXBOOT is finished, remove the XP CD and type EXIT and the machine will reboot.
Reconfigure your computer to boot from the hard drive if necessary.
You will now get the XP Boot loader with your choice of operating system.
In case of frequent hard drive crashes
Creating a first drive with a maximum of 200mb space and letting the rest of your drives 10gb or more.So even in case of a crash and
your drive and bootsector ends up blank you dont lose your MBR which could be crucial for startup/recovery measures.Also recommend
loading up this ~200mb C:/>drive with all the dos recovery,disk scan and sector edit tools you got so if you can setup a dos bootup on
that drive,you are presented the much valuable C:/> prompt even if your windows drive goes corrupt.Also recommend using a boot
manager from VCom which auto-updates incase of bootsector changes,invaluable if you install or partition often.
Recovering NTFS bootsector on NTFS partitions
Even after all precautions you might have to recover the bootsector of your windows drive sometime or other.This might be when a volume becomes inaccessible in the workstation or server or the Disk Management shows it as Unknown,then you might have a damaged or corrupted boot sector.
For this to work you must be having NTFS and not FAT because FAT does not keep a copy of the bootsector and ,
you must be able to boot into WinNT.If you cannot boot or move your drive,then you will have to resort to other methods that can be found on the internet.
We will be using Disk Probe (dskprobe.exe) for NT which ships on the NT V4.0 Resource Kit but will also run under NT V3.5x with the proper .dll files installed.
1. Using Disk Probe choose DRIVES, Physical Drive. Select the PhysicalDriveX
2. Double click on the PhysicalDriveX you wish to view. In the box below, uncheck Read Only and select the button Set Active. You will then notice that the Active Handle has been set to PhysicalDriveX, then select OK.
3. From the SECTORS Menu, select Read and insert 0 for STARTING SECTORS and 1 for Number of Sectors, Click Read.
4. You are now at the MBR of your Physical disk. You can verify this by the ASCII text on the right hand side beginning at Offset 8b which should read "Invalid Partition Table....". From the VIEW menu, select view Partition Table. Select the correct partition number which is in question.
5. We will need two values; Total Sectors, Relative sectors. Please note the Relative sectors value since this is where the bootsector should be located.
6. Select SECTORS, Read and input Starting sector as the value calculated in Step #5, Number of sectors to 1. Select Read and you should be at the location of your backup bootsector.
7. From the VIEW menu, select Bytes and verify that this is the NTFS bootsector. Once verified, from the SECTORS menu, select Write, make sure the dialog box shows the correct Handle and PhysicalDrive. In box Starting Sector to write Data, type in the number of Relative sectors you noted in step #5 and select the Buttion Write it.
8. Go to the SECTORS menu and type in the Relative sector from step #5 while keeping Number of sectors to 1, select Read. Here, please verify that the data was written.
9. Close Disk Probe and reboot your system.
Recovering Bootsectors of extended partitions:
1. Using Disk Probe choose DRIVES, Physical Drive. Select the PhysicalDriveX
2. Double click on the PhysicalDriveX you wish to view. In the box below, uncheck Read Only and select the button Set Active. You will then notice that the Active Handle has been set to PhysicalDriveX, then select OK.
3. From the SECTORS Menu, select Read and insert 0 for STARTING SECTORS and 1 for Number of Sectors, Click Read.
4. You are now at the MBR of your Physical disk. You can verify this by the ASCII text on the right hand side beginning at Offset 8b which should read "Invalid Partition Table....". From the VIEW menu, select view Partition Table. Select VIEW , As Partition Table.
5. In this view, in the Partition Table Index box, select your partition that contains your Extended partition. Once done, the System ID box should read "Extended". If the partition in question is the fourth logical drive in the Extended partition, click the Next partition button 4 times. The System ID box should now read "NTFS"
6. At this point, in the Partition Table Index box, select (double-click) your partition that contains your Extended partition. Once done, the System ID box should read "Extended."
Now, navigate to the logical volume that needs repair within the extended partition. If the damaged volume is the second volume in the partition, click the "Next Partition" button twice. As you navigate through volumes in the extended partition, the System ID field should indicate the file system of each partition.
Once you have found the partition that needs repair, record the current sector (from the title bar of Disk Probe), the relative sector, and total sectors of this volume.
7. Select SECTORS, Read and input Starting sector as the value calculated in Step #7, Number of sectors to 1. Select Read and you should be at the location of your backup bootsector.
8. From the VIEW menu, select Bytes and verify that this is the NTFS bootsector. You should see ASCII error text in the right hand column. If this sector does not appear to be a valid boot sector, do not continue. Start the process over and find the correct sector that contains the backup copy o the bootsector.
Once you have verified that this is the backup copy of the bootsector, write this sector to the location of the original boot sector you discovered in step 6. From the Sectors menu, select Write. Make sure the dialog box shows the correct Handle and PhysicalDrive. In the Starting Sector box, enter the location of the original bootsector. Click "Write it" to write this information to the disk.
9. Go to the SECTORS menu and select Read. In the starting sector, type in the Sector to which you wrote the backup copy, while keeping Number of sectors to 1. Select Read, and verify that the data was written.
10. Close Disk Probe and reboot your system.
MORE TIPS COMING SOON....
most of the tips require basic knowledge of DOS and WINDOWS.If any problems arise after doing as mentioned here,i am not responsible for any damage,corruption or error that you might impart to your computer.you have been duly warned and if you still feel you can do some damage you are free to do so.